This quilt is being made for my husband for our wedding anniversary. (
Coming up on the 3rd of May) Everyone in our family likes to slouch and
snuggle into our lounge and for that we always 'need' a quilt or
homemade blanket depending on the temperature.
This lap
quilt was totally inspired by a quilt called Queen Baby Quilt posted by
Alissa from www.handmadebyalissa.com on September 7 2011.
Of
course the fabric choice and colours are mine and I did make variations
to the type of blocks I decided to make. I've used a mosaic wonky mod
block.
You
can use scraps to make your wonky mod mosaic blocks. There really is no
size restriction, however I didn't go any smaller than 2.5 inches
and no larger than about 15 inches. Cut a variety of sizes in squares
and rectangles. ( Sorry for the poor quality photos. They were taken on
my phone. And on my bedspread and floor) But I'm sure you get the
picture. Lay out your pieces to estimate the size your blocks will
eventually be, by doing this you can then cut pieces that you may need
to complete your block. That way there should be no holes in your
composition.
To join: Place two pieces (squares/ rectangles) overlapping the edges
by about half an inch. Make sure the non overlapping pieces are
parallel. Use a ruler and rotary cutter and cut a slightly wonky line
through the two pieces of fabric. You should be left with two pieces
with a perfectly matched wonky angle.
Sew the two pieces
of perfectly matched sides either side of your sashing. I used a one and a
half inch wide measurement. That way I was left with a negative 1 inch sashing between my mosaics.
( Again, sorry for the bad quality photos and I have just thrown this quilt on the bed, so it is looking a bit rough)
We are currently renovating our home and have chosen a
really light colour pallet for our interior. A kind of modern beach
theme. So the colour choice for Steve's quilt (my gorgeous husband) had
to be light and beachy.
I used Kona natural for my negative space and a variety of blues from my stash.
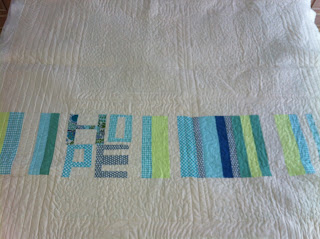
On
the backside of Steve's quilt I again used random width sizes of
rectangles to make a colour strip. I also wanted his quilt to carry a
message. This one was 'Hope'. There have been quite a few jokes made
about what this might mean. It really wasn't meant to be that deep.
I've
started to free motion stitch a stippling in the blocks and lines on
the negative spaced area. I'm doing them about an inch apart. Again,
this idea came from the Queen Baby Quilt posted by Alissa from
www.handmadebyalissa.com on September 7 2011. ( You can click on her
link under my inspirational sites menu)
I'm still trying to figure out what I'll do for my binding. Any suggestions?
Would love some feedback,
Lisa
 A regular quarter yard is 9" x 44" = 22.9cm x 111.8cm